Scaling your web application with Docker
Imagine, the web application you developed has suddenly become quite popular and you need to scale up. In the old days this required installing another virtual machine, which takes loads of time. Now, with the solution provided here, scaling up and down can be done in an instant. In this article I will show you how you can build an highly scalable environment for your web apps using Docker containers.
Contents
Docker is an open source tool for building and running containers. Containers are an all-in-one package filled with the application and its dependencies. The benefit of using containers is that it runs directly on the operating system, which saves you from a virtualization layer. Every container runs separately, so your environment will be multi-tennant safe.
Tooling
- Docker: In the current IT environment there is never enough speed, VM’s are slow and containers are hot. Docker is currently the most popular container software.
- Docker-compose: Tool for defining and launching multi-container applications.
- Haproxy: Open source load balancer for TCP and HTTP based services
- Consul: A tool for service discovery and configuration
- Apache with PHP: Just an example of a web application, but you can use any other web application type
- Supervisor: As we run next to the primary process a Consul application in the container we need something to launch them
- Virtualbox: Free hypervisor, supplied with Docker toolbox
- Git: Version control system for source code
Of the list above you only need to install the Docker toolbox. You can find it at the Docker website. Make sure you have the docker “default” virtual machine created by opening Docker Kitematic (container monitor shipped with Docker toolbox) or use ‘docker-machine create’ to create it.
Overview
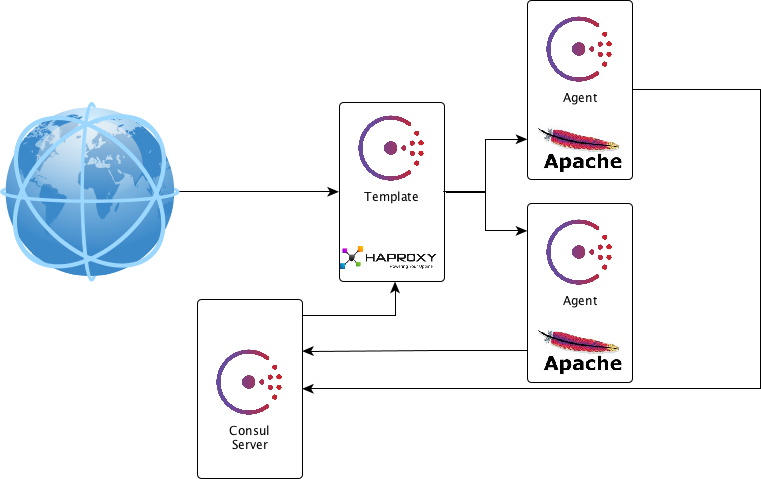
In the image below you can see how the environment will be. As you can see I use three different parts of consul: the agent, the server and template. The agent tells the server it is online and which services the machine/container has available. Consul-template queries the server and replaces the configuration file of Haproxy which it also restarts. On shutting down a webserver the Consul agent notifies the server it is leaving and Consul-template will remove the server from the configuration file.
How to start Docker
For Windows users: I prefer to use Git Bash instead of Docker Quickstart Terminal because it allows easy pasting (shift+insert).
After you installed the Docker Toolbox, you’re almost ready to go. We only need to do the following steps:
Open a terminal/command line and create a new Docker-machine with the command:
docker-machine create --driver "virtualbox" defaultTo prevent the other Docker tooling (like the Quickstart Terminal or Kitematic) creating a new Docker virtual machine, I’ve used the default name ‘default’. On starting the terminal/command line you will have to direct to the location of the Docker-machine (when you forget: you will get an error about not be able to connect:
eval "${docker-machine env default)"Docker containers
Three different containers can be identified:
- Consul server
- Load balancer with Consul-template
- Web service with Consul agent
First of all, get the Git repository with the example code:
git clone https://github.com/MansM/docker-scalingdemo.gitConsul server
Change to the folder in your terminal or Windows command line where the Git repository is located. The Consul server is the ‘consul-server’ container made by Gliderlabs, to start it:
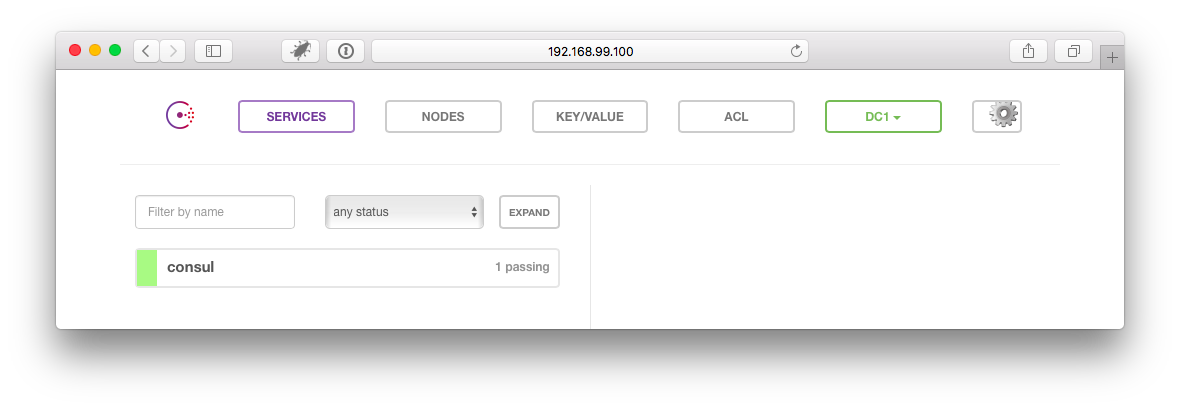
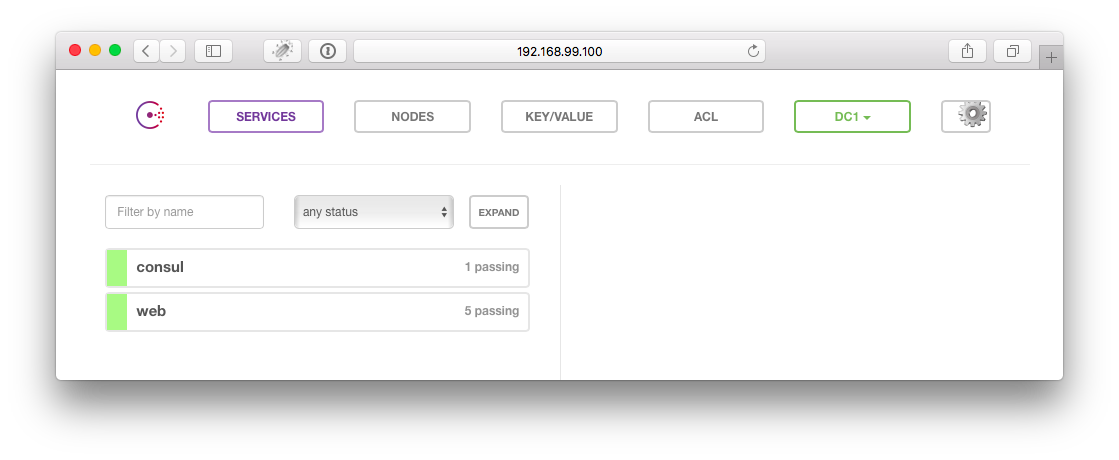
docker run --rm --name consul -p 8500:8500 gliderlabs/consul-server -bootstrap-expect 1To view the Consul server UI, you can browse to the docker_ip:8500, you can locate the IP with running the command:
docker-machine ip default If ‘default’ is not the correct Docker-machine, find the correct one with “docker-machine ls”.
You should now see something like:
Web application
Now it’s time to add a webserver to the pool. First of all we need to build and run the Docker container:
docker build -t apachephp apachephp
docker run  --rm --name web -p 8080:80 --link="consul" apachephp
When you refresh the Consul UI screen, you will see the web server has been added.
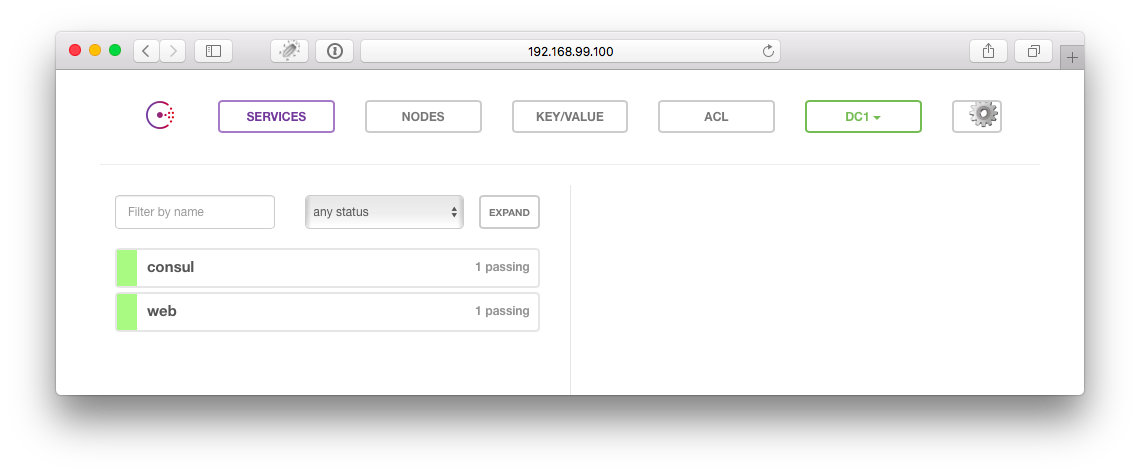
In the command to start the web server I have used the option ‘link’. Setting this parameter Docker will link the mentioned container to the new container.
Dockerfile
The main item of any Docker container is the Dockerfile, this contains the building steps from which Docker builds the image. In this case the base image we are using is PHP including Apache (line 1). On line 4 we install Supervisor and two utilities to get the rest of the Dockerfile working. The Consul agent is downloaded and installed on line 9. The configuration for Supervisor and Consul is copied into the image on line 12 and 13. The last line is the command which will be executed on launching the container, in this case starting Supervisor to launch the other processes.
1
2
3
4
5
6
7
8
9
10
11
12
13
14
15
FROM php:5.6-apache
ENV CONSUL_AGENT_VERSION=0.5.2

RUN apt-get update && apt-get install -y supervisor wget unzip
RUN apt-get clean

RUN mkdir -p /var/log/supervisor
RUN mkdir -p /etc/consul.d
RUN wget https://releases.hashicorp.com/consul/${CONSUL_AGENT_VERSION}/consul_${CONSUL_AGENT_VERSION}_linux_amd64.zip -O /tmp/consul-agent.zip && unzip /tmp/consul-agent.zip && mv consul /usr/local/bin

COPY src/ /var/www/html/
COPY supervisord.conf /etc/supervisor/conf.d/supervisord.conf
COPY web.json /etc/consul.d/web.json

CMD ["/usr/bin/supervisord"]
web.json
This file is the configuration for the Consul agent. The service web is the selector which later will be used to identify the needed containers. Line 7 is quite important, it makes the agent notify the server it is leaving when the container is stopped. This will save you from deregistering every stopped node in the Consul UI.
1
2
3
4
5
6
7
8
{
  "service": {
    "name": "web",
    "tags": ["php"],
    "port": 80
  },
  "leave_on_terminate": true
}
supervisord.conf
In the configuration file for Supervisor we mention that Supervisor should not be started as a daemon. The output will now be shown directly instead of being written to log files (and retrievable with “docker logs”).
1
2
3
4
5
6
7
8
[supervisord]
nodaemon=true

[program:apache]
command=/usr/local/bin/apache2-foreground

[program:consulagent]
command=consul agent -data-dir=/tmp/consul -join consul -config-dir /etc/consul.d
Load balancer
The final container in the setup is the load balancer. You can start it with the following commands:
docker build -t loadbalancer haproxy
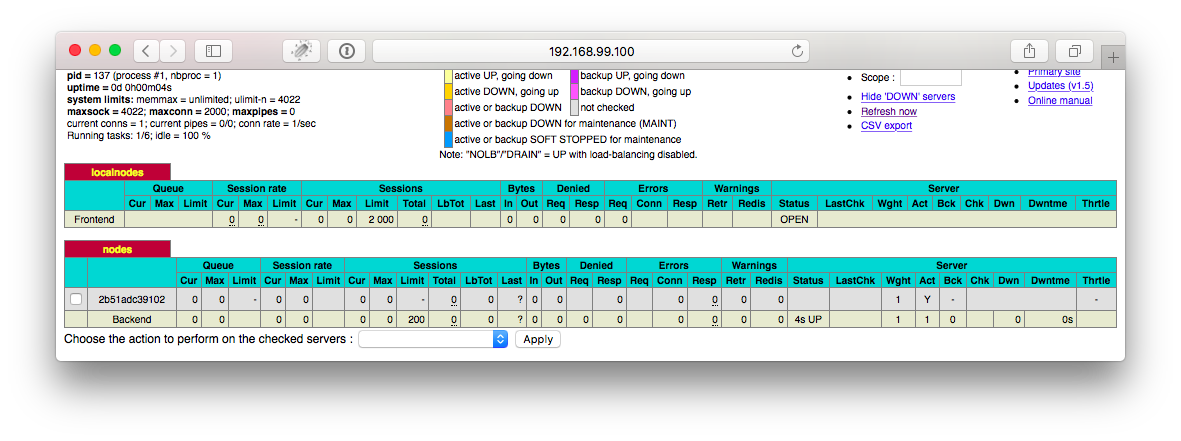
docker run --rm -p 80:80 -p 9000:9000 --link="consul" --link="web" --name loadbalancer loadbalancerThe load balancer exists of two main components: Consul-template and Haproxy. I have chosen Haproxy in this setup so I can switch to non-HTTP backends as well.
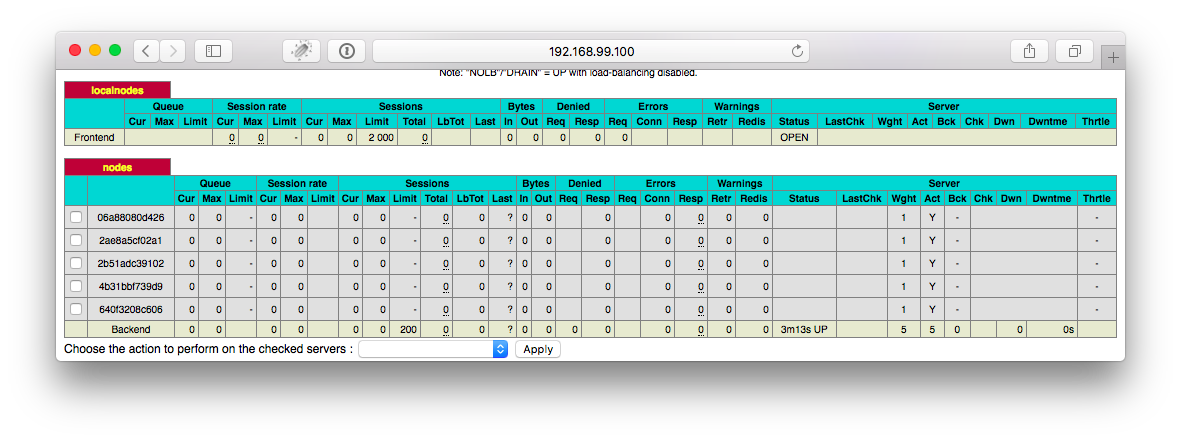
In your browser go to docker_ip:9000/haproxy_stats (User/Pass: admin) to see the statistics page of Haproxy, which shows a single backend webserver.
Dockerfile
The Dockerfile of the load balancer consists of installing the software (line 5 & 6) and copying configuration files into the image (line 9 & 10).
1
2
3
4
5
6
7
8
9
10
11
12
13
FROM debian:latest
MAINTAINER Mans Matulewicz
ENV CONSUL_TEMPLATE_VERSION=0.10.0

RUN apt-get update && apt-get install -y haproxy wget unzip
RUN ( wget --no-check-certificate https://github.com/hashicorp/consul-template/releases/download/v${CONSUL_TEMPLATE_VERSION}/consul-template_${CONSUL_TEMPLATE_VERSION}_linux_amd64.tar.gz -O /tmp/consul_template.tar.gz && gunzip /tmp/consul_template.tar.gz && cd /tmp && tar xf /tmp/consul_template.tar && cd /tmp/consul-template* && mv consul-template /usr/bin && rm -rf /tmp/* )
RUN apt-get clean

COPY haproxy.ctmpl /etc/haproxy.ctmpl
COPY haproxy.json /etc/haproxy.json

EXPOSE 80/tcp 9000/tcp
CMD ["consul-template", "-config=/etc/haproxy.json", "-consul=consul:8500"]
haproxy.ctmpl
Below is only a part of the Haproxy configuration file, the part that is modified by Consul-template. At line 7 the loop starts for every node that delivers the service web and it will create a line for every available server. Usually the word ‘check’ is placed at the end of every server-line to make Haproxy check for the availability of the server, however this is not necessary in this setup.
1
2
3
4
5
6
7
8
backend nodes
    mode http
    option forwardfor
    http-request set-header X-Forwarded-Port %[dst_port]
    http-request add-header X-Forwarded-Proto https if { ssl_fc }
    option httpchk HEAD / HTTP/1.1\r\nHost:localhost
    balance roundrobin {{range service "web"}}
    server {{.Node}} {{.Address}}:{{.Port}}{{end}}
haproxy.json
This is the configuration file for Consul-template. Using the source template file, it will generate the destination configuration file and will invoke Haproxy with the newly created configuration file.
1
2
3
4
5
template {
  source = "/etc/haproxy.ctmpl"
  destination = "/etc/haproxy/haproxy.cfg"
  command = "haproxy -f /etc/haproxy/haproxy.cfg -sf $(pidof haproxy) &"
}
With the information above I have shown you how Docker works and how you can manually spin up multiple containers to build a Docker environment. In the next part I will show you how you can simplify this and finally we get to scaling.
Docker Compose
Until now we have started all the containers one by one, but there is a more easy way to do it. We will using Compose, which is shipped with the Docker Toolbox. Before we can use it, we have to make sure all the manually started containers are gone, to prevents conflicts with ports. Below you can see the running containers:
Manss-MacBook-Air:~ Mans$ docker ps
CONTAINER ID        IMAGE                      COMMAND                  CREATED             STATUS              PORTS                                                                                NAMES
c475f80693b9        loadbalancer               "consul-template -con"   3 seconds ago       Up 3 seconds        0.0.0.0:80->80/tcp, 0.0.0.0:9000->9000/tcp                                           loadbalancer
ffd06220716f        apachephp                  "/usr/bin/supervisord"   17 seconds ago      Up 17 seconds       0.0.0.0:8080->80/tcp                                                                 web
16df4e7a5e64        gliderlabs/consul-server   "/bin/consul agent -s"   29 seconds ago      Up 28 seconds       8300-8302/tcp, 8400/tcp, 8301-8302/udp, 8600/tcp, 8600/udp, 0.0.0.0:8500->8500/tcp   consul
To stop them use the following command:
docker stop loadbalancer web consulTo start all the containers of this project, use the command:
docker-compose upIt will start all the containers and show the logging output in the terminal/command line.
Now it’s time for the stuff its all about: scaling! To increase the amount of web servers to 5, you just have to give this command:
Manss-MacBook-Air:scalingdemo Mans$ docker-compose scale web=5
Creating and starting 2 ... done
Creating and starting 3 ... done
Creating and starting 4 ... done
Creating and starting 5 ... done
Within a couple of seconds you are now running your web application on 5 webservers:
docker-compose.yml
All the magic of Compose is configured in the docker-compose.yml listed below. In essence it is just listing all the containers and the runtime parameters.
consul:
  image: gliderlabs/consul-server
  command: -bootstrap-expect 1
  ports:
   - "8500:8500"
loadbalancer:
  build: haproxy
  ports:
   - "80:80"
   - "9000:9000"
  links:
   - web
   - consul
web:
  build: apachephp
  links:
    - consul
Conclusion
Creating an highly scalable environment is not hard, as this blogpost will have shown you. It is usable for containers as well for virtual machines (if you really want to). In a later post I will add Docker swarm to the mix and extend the functionality over multiple (Docker-)machines.
Sources
- http://sirile.github.io/2015/05/18/using-haproxy-and-consul-for-dynamic-service-discovery-on-docker.html
- http://technologyconversations.com/2015/07/02/scaling-to-infinity-with-docker-swarm-Docker-compose-and-consul-part-14-a-taste-of-what-is-to-come/
Comments